 |
Selecting and deselecting boxes
|
Getting started with Freeway is easy using this section which provides you with an overview of the essential basic features. This section aims to get you started with the basic tools and techniques if you are new to professional page layout tools, or just want to get a quick overview of how Freeway might differ from other products you already know. The next section, Essentials Plus!, describes the essential things you need to know which specifically relate to Web publishing - even if you feel confident you know how the basics of Freeway work, and wish to skip this first section, be sure to read Essentials Plus! before you begin working with the software. Freeway is the new creative solution for professional Web site design, from SoftPress Systems. Designed to make the creation of leading-edge, interactive Web sites simple and intuitive, it blends immensely powerful production features with a familiar user interface which together offer unequalled ease-of-use and productivity. You create boxes to hold the content of your pages. Any box can hold either text, graphic or multimedia content. Boxes can have a range of shapes, and are created using the appropriate box drawing tool from the Tools palette.
With the appropriate tool selected, click and drag diagonally on the page to define the size of the box. You will see an outline drawn behind the cursor as you drag. When you release the mouse button, the box is created and shown on the page as a black outline. The handles at the corners and sides show that the box is selected. The active tool in the Tools palette reverts to the selection tool once you have drawn a box. Selecting and deselecting boxes When you first draw a box, it is left selected. This means that it will be affected by any actions you make. If you wish to deactivate the current selection, click on an empty area of the page. To select and work with objects on the page, you use the Selection tool. To select a box, you can click anywhere on the edge of the box using the Selection tool. A hollow pointer tells you when you are over the edge of the box and may click to select the box.
TIP - Another, sometimes easier way is to hold down the Command key and click anywhere within the box. You can do this at any time, no matter which tool you have selected. To move boxes on the page, use the selection tool. Place the tip of the selection tool's pointer arrow on the edge of the box, and drag to move it.
TIP - Alternatively, you can hold down the Command key and drag anywhere within the box to move it, using any tool. To resize a box, or a selection of boxes, use the Selection tool. Select the box as above, then move the pointer over one of the selection handles. You will see the pointer become a tail-less solid arrow when you are able to resize the box.
Drag the selection handle to resize the box. Any box drawn in Freeway can contain text, unless it already contains graphic or multimedia content. To add text to a box, you must place a text insertion point in the box. You do this by clicking inside the box using the selection tool. When the selection tool cursor is over a box where you can add or edit text, the cursor becomes an I-beam.
You can type directly into boxes, or you can bring in text from outside Freeway. There are four ways of getting text into Freeway; · Copy/Paste from another application · Choose the Import Text command from the File menu while you have a text insertion point active · Drag and Drop the text from another application that supports Drag and Drop, such as Claris Emailer, ClarisWorks, Scrapbook, SimpleText or BBEdit. · Drag and Drop a text file from the Finder desktop You can select text in the following ways: · Drag the cursor across the text · Click twice on a word to select it · Place the cursor in the box and type Command-A
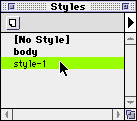
You format text by applying a range of typographical features. The type of features available depends on the format of your text. HTML format has a more limited number of features while GIF text offers a much wider range. The Text panel in the Inspector palette offers controls for both HTML and GIF features depending on the format you have chosen. The Style menu has a fuller range of typographical attributes most of which can be applied only to GIF text. When you apply attributes to text Freeway creates a new temporary style and lists it in the Styles palette. Any style shown in the Styles palette can by applied to selected text by clicking the style name in the palette.
Freeway imports a number of graphic file formats. You add a graphic by: 1. Drawing a box, 2. Choosing File/Import ... 3. Locating the graphic file and clicking Open. Freeway imports the graphic and displays it on the page. Freeway selects the export type for images generated from Freeway based on the number of colors in the original graphic file that is imported. If the original graphic was capable of storing 256 colors or less, the item is set to export as GIF. If the original graphic was capable of storing more than 256 colors, the item is set to export as JPEG. You can change the export type for any item using the Export panel of the Inspector palette. Select the item and choose the new type from the Type popup menu.
When Freeway exports graphics as GIF images, you can control the number of colors stored in the image, and also the palette from which these colors are drawn. Other options include the ability to control whether the graphic is interlaced and whether non-reproducible colors are approximated using dithering. You can alter the number of colors using the slider bar on the Export panel.
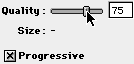
Freeway allows you to control the quality and compression of JPEG graphics. The Export panel in the Inspector palette allows you to set the quality of JPEGs using the slider bar. You can also select whether the JPEG displays progressively (in stages) by clicking the Progressive check box on.
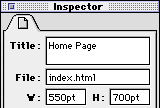
When creating a site, you need to create individual pages which are linked together using Hyperlinks to allow visitors to navigate from one page to another. Unless you provide these links, they cannot go to other pages. In this regard, Web site design is closer to designing a house than publishing a book. You can think of the different sections of your site as rooms in a house, and you get to control where people can go next from each room. If you create a page with no links into it, it's like having a room in the house you designed which has no doors or windows - no one will ever even know it is there. When you design your site, you create a Freeway document, and define a page in this document for every page which you want to create in the exported site. You can also define folders in the document and keep related pages together in the same folder, as in a filing cabinet. When the site is exported into the destination folder, the subfolders you defined in Freeway will be created in the same hierarchical structure. You can specify the default page dimensions when you first create a Freeway document, or change them at any time, using the Document Setup dialog box. You can alter the size of individual pages using the Page panel of the Inspector palette.
Freeway uses master pages to hold the items which appear on more than one page of your document. You create different master pages for each of the types of pages in your document. For example, you may want one design for marketing pages and another design for pages used for ordering products. Switch to Master pages using the popup menu at the bottom of the Freeway document window
After you have created the master page, you apply it to the document page by displaying the document page, selecting the Page panel in the Inspector palette and choosing the master page from the Master popup menu.
Guides are non-publishing lines which help you align boxes, content and other items on your page. You pull individual vertical and horizontal guides onto pages from the rulers.
Freeway's Grids dialog box sets up a system of guides allowing you control over the number of horizontal and vertical lines, their spacing and their start and end positions. You can apply a grid to the document as a whole or to an individual page. Display the Grids dialog box by choosing Page/Grids....
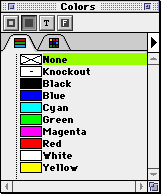
The easiest way to work with colors in Freeway is to use the Color palette. The palette has a Net-safe panel and a Custom panel; select the one you want to work with using the tabs at the top of each panel. Using the palette you can apply colors, select Net-safe or custom colors, edit and delete colors and use the Color picker to select additional colors for your document.
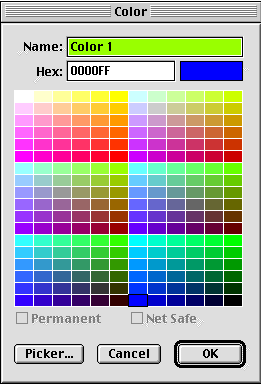
You can add or edit colors using the Color Picker. To add a color click on the arrow on the Color palette and choose New color. To edit a color choose Edit Colors..., select the color and click on the Edit button. This displays the Color dialog box. You can click on one of these colors to add it to the Custom panel or you can click on the Picker... button to specify a color using the standard Apple color pickers.
Note: The default colors that are initially shown in the Color palette cannot be edited. |
|||


Back to the top |
|||